


Showing posts with label tutorials. Show all posts
Showing posts with label tutorials. Show all posts
Monday, April 23, 2012
A very punctual ring bearer pillow.
I *love* this ring bearer pillow DIY on MS Weddings. It matches my Punctual save-the-date so well, too!


Friday, August 6, 2010
Fun ideas for DIY paper lovers.
Martha, Martha, Martha. If only her website had been so robust when I was married six years ago. This set of DIY tutorials for paper lovers is to die for. Fortunately, I can always carry these ideas over to a fab party today. Hope you all have a great weekend!


Wednesday, May 19, 2010
A modern garland tutorial.
If you didn't see this garland tutorial from Hambly Screen Prints recently, check it out. It's super easy and would make such a sweet addition to a handmade wedding. I can picture it strung up in a photo booth or across the front of a candy buffet. Where would you put it?

via craftzine
via craftzine
Monday, March 29, 2010
Tiered cake stand tutorial.
Good morning! Just popping in to share a great DIY tutorial from Amber Lee at Giver's Log. Her clever thinking has just opened up a world of possibilities for me! Enjoy...


Wednesday, February 17, 2010
Great favor idea: sea glass candy.

Wouldn't this sea glass candy make a beautiful favor? I'm envisioning little clear baggies with a fun tag and ribbon... Plus, you can customize the color. Visit this great tutorial for full details on how to make your own. Enjoy!
Wednesday, October 28, 2009
A very inspired DIY dessert buffet.

Love the look of dessert buffets, but can't quite fit one into your budget? Or, are you already married, but looking forward to hosting a fabulous party this holiday season? Why not do it yourself? Maddy at The Inspired Bride posted an amazing set of tutorials this week. The resulting look is so impressive that your guests will never suspect that you put it together!
- Overview
- Centerpiece
- Winter Wonderland Cupcakes
- Winter Wonderland Brownie Pops
- Marshmallow Pops
- Candy Display
- Dessert Buffet Treat Bags
Think you might try it? I'm seriously considering it...
Tuesday, September 15, 2009
A DIY burlap banner.
Looking to add a handmade or rustic touch to your event? This darling DIY banner is easy to make and adds a fun touch to any setting. Add your names to it and drape it across the front of a buffet perhaps. Find the tutorial over at Little Old Hat...

Via Craftzine.com
Via Craftzine.com
Monday, August 17, 2009
DIY edible favors.
Looking for a fun DIY favor that you know everyone will love? Why not make your own chocolate dipped pretzels, package them in a pretty bag and add a little tag? Check out Heather Bailey's website for a scrumptious photo tutorial.


Tuesday, August 4, 2009
A fun little belt for any dress.

When I saw this sassy little belt, I immediately began trying to figure out what I would pair it with. A brightly colored cardigan perhaps? Hmmm. I'm not great with a sewing machine or needle and thread (of any kind), but I might actually give this little cutie a go. I just love it! Be sure to check out the seemingly easy tutorial at 100 Layer Cake for full details on how to make your own.
Thursday, July 9, 2009
A fun tutorial.
I can't get enough of Martha this week (or most weeks, really). The newest issue of MS Weddings has a great DIY section that includes this fun idea: a flag conversation starter. Guests add their name to a flag and pin it to the year they met the happy couple. What a fun souvenir to take home at the end of your big day!

Wednesday, April 15, 2009
A darling placecard idea.

I love this darling placecard idea from Papier Valise. Wouldn't it have been cute for Easter? Seeing how I already have the little Martha Stewart bird punch in my collection, I might just have to tuck this idea away for next year. Check out the link for a full step-by-step tutorial. So cute!
Wednesday, March 4, 2009
Teacups turned table numbers.

I love the possibilities that these numerical mugs from Anthropologie bring to mind. Although they are only available in a handful of digits, why not create your own and use them as table numbers? For a shabby chic-inspired wedding, pair them up with pretty teapots and small floral arrangements for a lovely alternative to the standard centerpiece.
To make your own table number teacups, try scouring thrift stores or Etsy for a mixed collection of pretty little cups. Purchase some large number rub-ons from a local craft store or online shop such as Scrapbook.com (see this link for a good option). Alphabet packets typically include numbers, as well. Rub on your numbers according to package directions and you're done! I suspect they might not function as actual cups afterwards, but could certainly be used as random elements in your decor.
Monday, February 23, 2009
An Etsy find turned mini scrapbook.


When I came across these letterpress coasters from Sarah Parrott's Etsy shop, I knew there was no way I could actually use them as coasters. They're just too good for holding wet beverages. ;) Instead, I turned them into a meaningful gift for my musician hubby.
To make my mini album, I first ordered a handful of 3.5 x 5 reprints of meaningful music-related photos involving my DH in some way. I included shots of us at a show, one of him leading Christmas carols, another of him singing at our wedding... you get the idea. I then adhered the photos to the back of each coaster using a strong double-sided stick tape and trimmed off the excess with a pair of fine point scissors. On the back side of the final coaster, I adhered a little music-related love note that I printed at home.
The whole project took less than an hour and was quite a hit when I gave it to him for Valentine's Day. For more details, click each photo to enlarge. Enjoy!
Wednesday, February 4, 2009
DIY: Reception card box.

If you liked the card box shown in Monday's featured wedding, here is a step-by-step guide to creating your own. Enjoy!
SUPPLIES
All supplies can be purchased at a local craft and hardware store. This supply list makes 32-40 ribbon wands.
- Paper box: Purchase one large paper mache box from a local craft store.
- Varying widths of double-face satin ribbon
For added interest, choose a combination of colors that complement your wedding palette. - Paint: Purchase one small bottle of craft paint in the color of your choice.
- Sponge brush
DIRECTIONS
- Using a utility blade, carefully cut a slit into the lid of the box. Be sure to make it wide enough to accommodate large greeting cards.
- Paint the box.
- Cut the ribbon into appropriate lengths to fit around the box. Cut ribbon at an angle to avoid any fraying that might occur.
- Using a heavy-duty permanent adhesive (such as a Tombow roller), adhere each ribbon strip to the box. Create variation by alternating wide and narrow widths of ribbon. Adorn the lid as desired.
Wednesday, January 28, 2009
DIY: Photo thank you cards + sashes.


Looking for a unique thank you card? With a bit of crafty know-how and an online photo service (such as Shutterfly.com), you can create a card that doubles as a keepsake from your wedding. Download the free template for sashes that I've created and follow these steps to make your own.
STEP 1
Upload a high resolution wedding photo to an online photo service and order matte finish notecards. To create the example, I ordered the 5 x 7 size. Shutterfly, in particular, also includes envelopes with all notecard purchases (score!).
STEP 2
Download and print the sash template as many times as need be. A somewhat translucent paper or ink-jet friendly vellum works particularly well since the image will show through below. If you are printing on vellum, try using the "transparency" setting on your printer for better results.
STEP 3
With a personal paper cutter, trim sashes to a finished size of 11 x 1.5 inches. One inch of the sash will be used to create an overlapping piece for adhesive.
STEP 4
When you're ready to add the sash to the cards, center the "thank you" message on the front and wrap the sides around the back. Roll a strip of permanent adhesive along the overlapped piece in back. As previously recommended, the Tombow mono adhesive tape roller is great (and readily available at most craft stores and online retailers such as Scrapbook.com).
Check back tomorrow for a fun giveaway! ;)
Thursday, December 18, 2008
DIY: Satin cake platform.

Shown in Tuesday's moss + robin's egg blue palette, this platform is an easy way to add a little color detail to your cake table. Follow these easy steps and contact me (by leaving a comment) if you have any questions. You're on your own, however, to find the fabulous cake! ;)
- Purchase an unfinished wooden platform. There are many available on ebay, but you might also check your local lumber supplier. If you have a handy fiance, you can also put him to work and cut one from scratch. ;) The platform should be 1-2 inches larger than the base of your cake.
- Cover the platform with a non-toxic craft paint. The above example was painted white.
- Cut a piece of heavy satin ribbon to the correct length by wrapping it around the edge of the platform. Make sure to purchase a ribbon the same width as the height of your platform. Before cutting, add a bit of extra length to later create a slight overlap at the beginning and end of the ribbon.
- Adhere ribbon to the platform using crafter's glue. Smooth out glue before placing ribbon to avoid any unsightly bumps. Allow ample drying time before adding your cake to the top. Good luck!
Monday, December 1, 2008
DIY: Diaper cake.


This past spring, I put together a diaper cake for a co-worker who became a new mother. She was on bed rest for a good portion of her pregnancy, so I wanted to send over a special treat that was not only cheerful, but also useful. If you are hosting a baby shower, this project could also double as a pretty (and unique) centerpiece.
Although it might look complicated, the "cake" was fairly easy to create. I followed these instructions, but think there should have been direction as to what size of a cardboard cake platform to use. I ended up with one that was a bit on the large side, so I'd recommend getting the 14" size.
Now, I just have to wait for more friends to procreate... ;)
Monday, November 24, 2008
DIY: Modern favor tags (and a free template!).
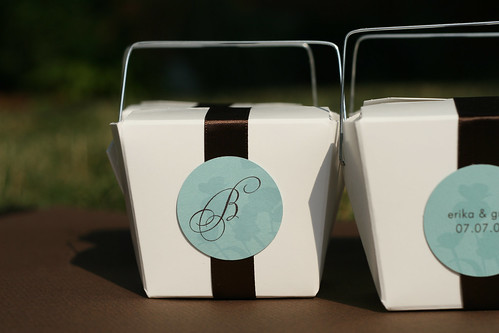
It's easy to create favor packaging that is modern and classic. By combining an inexpensive satin ribbon with a tag that has been printed at home, you can dress up takeaway boxes or other containers without eating up your budget.
Using the first in our series of free wedding templates, you can create your own tags by following these steps:
STEP 1
To get started, download the monogram labels (shown above) in chocolate brown or black. Once you have downloaded the template, print your specific monogram's page at 100% of the original size on the cardstock of your choosing. Colored cardstock that coordinates with your wedding colors looks especially great.
STEP 2
Once you have printed enough pages to cover the number of favors you plan to produce, use a pair of scissors to cut the sheets into horizontal strips. Be careful not to cut into the faint circle outlines you see printed on each page, cutting in between each row wherever you please.
STEP 3
Using a 1 1/2" circle punch (available at most craft stores and online retailers such as Impress), punch each circle to produce the finished tag. If you are using a traditional punch, turn it upside down to line it up with the faint outline that has been printed on each sheet. Following this method, punch out all of the tags.
STEP 4
If you are ready to adhere it to your favor packaging, roll a strip of permanent adhesive on to the back of each tag. We like the Tombow mono adhesive tape roller for projects like this. It's affordable, refillable and extremely sturdy. Like the circle punch, the Tombow roller is available at most craft stores and online retailers such as Scrapbook.com.
Friday, November 21, 2008
DIY: Monogram Banners.

Make the entrance to your ceremony or reception with these elegant monogram banners. After your big day has come and gone, they're wonderful mementos.
SUPPLIES
All supplies can be purchased at a local craft. The finished size of these banners is approximately 26" tall by 22" wide with the initials being 14" tall.
- Upholstery fabric: Purchase enough fabric to make two 26" x 22" banners. When possible, choose a heavy upholstery fabric in your color palette.
- Stitch-witchery or sewing machine
- Dowel rods: 4 in 1/4" widthCut dowel rods to approximately 30" long.
- Styrofoam: 22 sheets of floral styrofoam, approximately 1" thick.
- Floral buds: Purchase bunches of inexpensive, seasonal flowers.
- Ribbon: Choose a sturdy satin ribbon.
- 2 Snaps per banner: You can use other alternatives, such as Velcro. These are not required if you wish to create a triangular hanger.
- Hot glue gun
- Invisible fishing line thread
DIRECTIONS
- After cutting the fabric to size, use stitch-witchery or a sewing machine to hem the edges. Create a pocket at the top and bottom of each banner by folding the fabric over and placing the hem low enough for the dowel to fit into. Be sure to leave openings on either side so the dowel can slide in easily.
- Using software such as Microsoft Word, print initials at desired size. The sample used letters that were approximately 14" tall. To print at this size, use the "tile" setting on your printer to create a large stencil. Doing so will print the initial onto several pages that can then be cut out and taped together.
- Trace around the initials' edges onto styrofoam. Cut with a utility blade.
Tip: If the styrofoam breaks, it's not a problem. You can hot glue it back together. For added support, use wooden skewers to support any breaks that might occur. - If you purchased flower buds in bunches, you will want to cut off individual buds. Using these individual buds, cover the letters completely using hot glue and by pushing the stems into the styrofoam.
- To attach the letters to the banners, use a combination of hot glue and clear fishing line to attach/sew the letters to the material.
- Attach ribbon to dowel rods. Sew snaps to the appropriate place on the ribbon to create a hanging loop. Creating a triangular hanger is much easier and only involves looping one large piece over each end of the dowel.
Thursday, November 20, 2008
Different ways to... exit the ceremony.
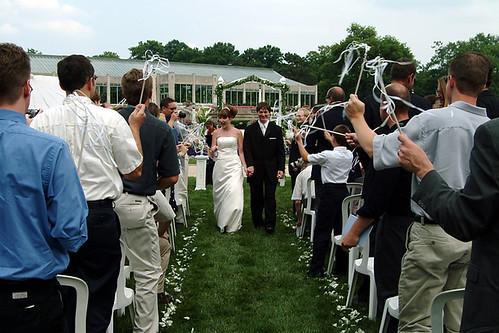
This is the beginning of a series of posts on different ways to do things at your wedding. From walking down the aisle to exiting your reception, the ideas presented here will range from traditional and classic to modern and unique. My goal for these posts is to help you think outside of the box by introducing a little something that will give your big day a more personal feel.
So, let's start with a different way to exit the ceremony. Bells and bird seed are good options, but the visual element created by ribbon wands makes for exciting wedding photos! Add a little note to your ceremony program to cue your guests when it's time to stand up and wave.
SUPPLIES
All supplies can be purchased at a local craft and hardware store. This supply list makes 32-40 ribbon wands.
- Ribbon: 100 yards
Purchase approximately 100 yards of thin inexpensive ribbon. Choose a color combination, or one solid color, that suits your needs. Additionally, if you want your ribbon wands to be fuller than those shown in the sample image, just add more ribbon. - Dowel rods: 32-40 in 1/4" width
Craft stores sell dowel rods at pre-cut lengths in bags of 8-10. The 12" length makes for an ideal ribbon wand. While you can also purchase dowel rods at a hardware store, you will most likely have to cut them to your desired length. - Paint
Purchase one small bottle of craft paint in the color of your choice. The ribbon wands shown in the sample image were covered with a metallic pearl coating. For a simpler option, you can also leave them unfinished. - Sponge brush
- Sandpaper: Fine grade
- Screw eyes: 40 in 214 x 13/16 size
These can be difficult to screw into the head of each dowel, so use pliers after getting it started. Also, be gentle, as the wood can split.
DIRECTIONS
- Using the sponge brush, paint all dowels. Stand them on end in holes punched in a piece of styrofoam to dry.
- After the wands have dried completely, gently sand them with fine grade sandpaper. Painting may roughen the surface, so sanding them will remove rough areas without removing the paint.
- Attach a screw eye to one end.
- Cut the ribbon into 15-20" lengths. Cut ribbon at an angle to avoid any fraying that might occur.
- Gather a total of 5-6 ribbons and slip through the screw eye. Tie in a nice, tight knot.
Subscribe to:
Posts (Atom)

 Posts


