Shop invitations + more at Maida-Vale.com
Showing posts with label free templates. Show all posts

Wednesday, January 28, 2009

DIY: Photo thank you cards + sashes.


Looking for a unique thank you card? With a bit of crafty know-how and an online photo service (such as Shutterfly.com), you can create a card that doubles as a keepsake from your wedding. Download the free template for sashes that I've created and follow these steps to make your own.

STEP 1
Upload a high resolution wedding photo to an online photo service and order matte finish notecards. To create the example, I ordered the 5 x 7 size. Shutterfly, in particular, also includes envelopes with all notecard purchases (score!).

STEP 2
Download and print the sash template as many times as need be. A somewhat translucent paper or ink-jet friendly vellum works particularly well since the image will show through below. If you are printing on vellum, try using the "transparency" setting on your printer for better results.

STEP 3
With a personal paper cutter, trim sashes to a finished size of 11 x 1.5 inches. One inch of the sash will be used to create an overlapping piece for adhesive.

STEP 4
When you're ready to add the sash to the cards, center the "thank you" message on the front and wrap the sides around the back. Roll a strip of permanent adhesive along the overlapped piece in back. As previously recommended, the Tombow mono adhesive tape roller is great (and readily available at most craft stores and online retailers such as Scrapbook.com).

Check back tomorrow for a fun giveaway! ;)

Monday, November 24, 2008

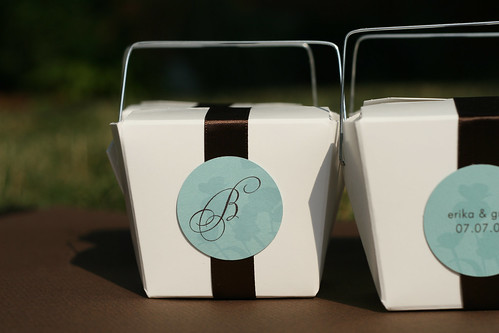
DIY: Modern favor tags (and a free template!).


Wedding Favor Packaging, originally uploaded by Maida Vale.

It's easy to create favor packaging that is modern and classic. By combining an inexpensive satin ribbon with a tag that has been printed at home, you can dress up takeaway boxes or other containers without eating up your budget.

Using the first in our series of free wedding templates, you can create your own tags by following these steps:

STEP 1
To get started, download the monogram labels (shown above) in chocolate brown or black. Once you have downloaded the template, print your specific monogram's page at 100% of the original size on the cardstock of your choosing. Colored cardstock that coordinates with your wedding colors looks especially great.

STEP 2
Once you have printed enough pages to cover the number of favors you plan to produce, use a pair of scissors to cut the sheets into horizontal strips. Be careful not to cut into the faint circle outlines you see printed on each page, cutting in between each row wherever you please.

STEP 3
Using a 1 1/2" circle punch (available at most craft stores and online retailers such as Impress), punch each circle to produce the finished tag. If you are using a traditional punch, turn it upside down to line it up with the faint outline that has been printed on each sheet. Following this method, punch out all of the tags.

STEP 4
If you are ready to adhere it to your favor packaging, roll a strip of permanent adhesive on to the back of each tag. We like the Tombow mono adhesive tape roller for projects like this. It's affordable, refillable and extremely sturdy. Like the circle punch, the Tombow roller is available at most craft stores and online retailers such as Scrapbook.com.