This is the beginning of a series of posts on different ways to do things at your wedding. From walking down the aisle to exiting your reception, the ideas presented here will range from traditional and classic to modern and unique. My goal for these posts is to help you think outside of the box by introducing a little something that will give your big day a more personal feel.
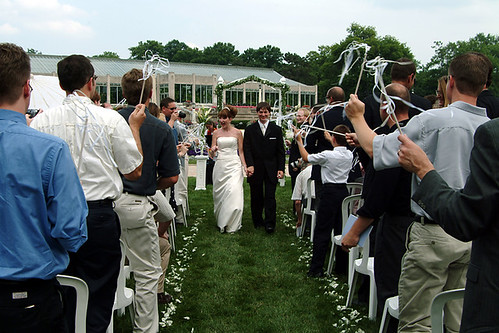
So, let's start with a different way to exit the ceremony. Bells and bird seed are good options, but the visual element created by ribbon wands makes for exciting wedding photos! Add a little note to your ceremony program to cue your guests when it's time to stand up and wave.
SUPPLIES
All supplies can be purchased at a local craft and hardware store. This supply list makes 32-40 ribbon wands.
- Ribbon: 100 yards
Purchase approximately 100 yards of thin inexpensive ribbon. Choose a color combination, or one solid color, that suits your needs. Additionally, if you want your ribbon wands to be fuller than those shown in the sample image, just add more ribbon.
- Dowel rods: 32-40 in 1/4" width
Craft stores sell dowel rods at pre-cut lengths in bags of 8-10. The 12" length makes for an ideal ribbon wand. While you can also purchase dowel rods at a hardware store, you will most likely have to cut them to your desired length.
- Paint
Purchase one small bottle of craft paint in the color of your choice. The ribbon wands shown in the sample image were covered with a metallic pearl coating. For a simpler option, you can also leave them unfinished.
- Sponge brush
- Sandpaper: Fine grade
- Screw eyes: 40 in 214 x 13/16 size
These can be difficult to screw into the head of each dowel, so use pliers after getting it started. Also, be gentle, as the wood can split.
DIRECTIONS
- Using the sponge brush, paint all dowels. Stand them on end in holes punched in a piece of styrofoam to dry.
- After the wands have dried completely, gently sand them with fine grade sandpaper. Painting may roughen the surface, so sanding them will remove rough areas without removing the paint.
- Attach a screw eye to one end.
- Cut the ribbon into 15-20" lengths. Cut ribbon at an angle to avoid any fraying that might occur.
- Gather a total of 5-6 ribbons and slip through the screw eye. Tie in a nice, tight knot.