|
 |
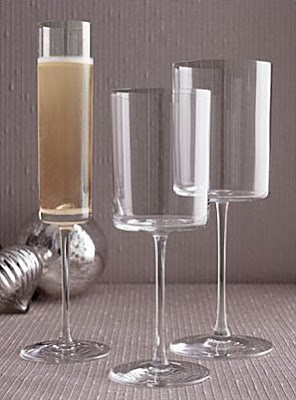 Wouldn't champagne served in an Edge flute from Crate & Barrel be a wonderful way to ring in the new year? If you're a New Year's Eve bride, grab a pair and toast your new marriage in style at the stroke of midnight. I'll be back in '09. ;)
 Just before Christmas, Seattle was buried in snow and ice. My husband and I were stuck in the house for several days. Finally venturing out one afternoon to fend off cabin fever, we hit a local bookstore. I picked up Seattle Bride and saw this beeeeautiful cake from Jen's Desserts. How very appropriate for at wedding at this wintery time of year! Image credit: Photograph by Rachel Olssen/Seattle Bride, Cake by Jen's Desserts
 As promised, here's a sneek peek of this year's holiday cards! Since we live in Seattle, I created a coffee themed illustration. Starbucks is based here (alongside many amazing local coffee roasters) and nearly everyone is addicted to a warm beverage of some sort. Using the beloved Gocco, I screenprinted my simple design onto many, many cards. I also created a second, more literal version of the card that incorporated a "cardboard" sleeve. Both versions were a fair amount of work, so I am glad they are done and mailed! I'll be back the week of 12/29. Until then, warm holiday wishes... from Seattle. =)
 Shown in Tuesday's moss + robin's egg blue palette, this platform is an easy way to add a little color detail to your cake table. Follow these easy steps and contact me (by leaving a comment) if you have any questions. You're on your own, however, to find the fabulous cake! ;) - Purchase an unfinished wooden platform. There are many available on ebay, but you might also check your local lumber supplier. If you have a handy fiance, you can also put him to work and cut one from scratch. ;) The platform should be 1-2 inches larger than the base of your cake.
- Cover the platform with a non-toxic craft paint. The above example was painted white.
- Cut a piece of heavy satin ribbon to the correct length by wrapping it around the edge of the platform. Make sure to purchase a ribbon the same width as the height of your platform. Before cutting, add a bit of extra length to later create a slight overlap at the beginning and end of the ribbon.
- Adhere ribbon to the platform using crafter's glue. Smooth out glue before placing ribbon to avoid any unsightly bumps. Allow ample drying time before adding your cake to the top. Good luck!
Image credit: Bride's
 Instead of going for a traditional powder blue and white winter wedding, why not add a bit of shimmer and a punch of green? The silk shantung of this Simple Silhouettes dress is undeniably festive. To offset the cost of the dress, pair it up with an affordable baby's breath bouquet that is easy to put together on your own. This will pull in the moss green and save you a bundle. Credits (clockwise from top left):
Sew Lovely, Real Simple, Simple Silhouettes, Brides, The Knot
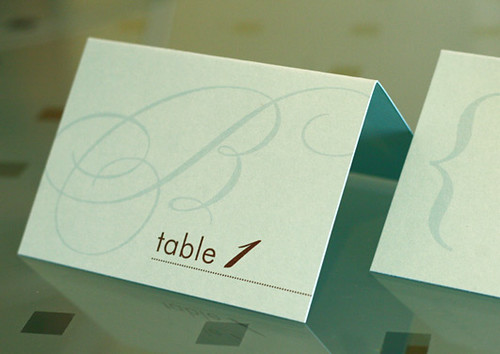
It's a new week! The sun is shining here in Seattle and the snowy mountains are out in full force. Since things here are going good, why not start the week off with a bang? I'll post a new holiday-inspired color combination tomorrow. The simple table number cards shown above should fit in pretty well with it...
 I thought it might be fun to stray off topic a bit so I could share a cupcake recipe. I'm more than a little cupcake-obsessed and often wish the craze would have occurred sooner so I could have had a cute little cupcake tree at my wedding! Anyhow, we go nuts for Trader Joe's Candy Cane Joe Joe's each holiday season. I thought it might be possible to incorporate them into a cupcake crust of some sort this year, but wasn't sure how to achieve it. After snooping around online a bit, I found The Bumbling Baker and her post on Oreo cupcakes. This provided the perfect starting point for me (even though mine didn't come out as plump and lovely as hers!). The results were divine. Here is how I put mine together: Step 1:
Remove the top from 24 Candy Cane Joe Joe's. Place half with filling in the bottom of your cupcake liner or pan. Set tops aside. Step 2:
Using your favorite recipe for a moist (and preferably rich) chocolate cake, blend batter and pour over the cookies. Bake and let cool on a wire rack. Step 3:
Make a peppermint cream cheese frosting. Ice cupcakes once they have cooled. I chose a recipe (as follows) from the book Cupcakes Galore. Ingredients:
1/2 cup cream cheese, softened
1 tablespoon milk
pinch of salt
a few drops of mint extract
2 1/2 cups powdered sugar To make:
In a large bowl, blend cream cheese, milk, salt and mint extract. Beat well. Gradually blend in powdered sugar until smooth and creamy.
Step 4:
If desired, top with a peppermint candy. Enjoy!
 When I saw this Charsa dress, I thought it would be perfect for a wedding around the holidays. She's wrapped up like a pretty package! Add peppermint or pomegranate martinis as a signature cocktail and you have the start of one very fun winter wedding. Since I'm already married, I guess I'll have to settle for keeping this dress in mind for a formal party... ;) Credits (clockwise from top):
The Knot, AbsoluteWeddingStore, Allie by Charsa, Solitaire by Stuart Weitzman, Spokane7
 Continuing with color combinations inspired by the holidays, another palette will be unveiled tomorrow. The Cosmopolitan save-the-date card (as shown above) would be a great companion to it ( hint hint). And, did you know that when you order 1-color versions of our 2-color designs, you save $25? Until tomorrow...
 The house has been covered from top to bottom in silk-screened holiday cards! I'm happy to say that I have finally finished them and they will be in the mail very soon. No more ink under this girl's fingernails! After I'm certain that friends + family have received their cards, I'll post some photos of this year's creation. To celebrate checking another thing off my to-do list (and as a little holiday giftie to you), I'm offering a 10% discount on all invitation + birth announcement orders through December 31st. Just enter the code "BLOG1208" when purchasing. I'm off to Portland for the evening and will be back on Wednesday. Happy Holidays!
Why Marriage?
by Mari Nichols
Because to the depths of me, I long to love one person,
With all my heart, my soul, my mind, my body.
Because I need a forever friend to trust with the intimacies of me,
Who won't hold them against me,
Who loves me when I'm unlikable,
Who sees the small child in me, and
Who looks for the divine potential of me.
Because I need to cuddle in the warmth of the night
With someone who thanks God for me,
With someone I feel blessed to hold. Because marriage means opportunity
To grow in love in friendship. Because marriage is a discipline
To be added to a list of achievements. Because marriages do not fail, people fail
When they enter into marriage
Expecting another to make them whole.
Because, knowing this,
I promise myself to take full responsibility
For my spiritual, mental and physical wholeness
I create me,
I take half of the responsibility for my marriage
Together we create our marriage. Because with this understanding
The possibilities are limitless.
 My tree is decked out in teal and gold with touches of ivory and chocolate this year. What a yummy wedding palette this would create any time of year! And that dress? Yes, please! As December carries on, I'll try to post more festive combos like this. Credits (clockwise from top):
lanterns from Martha Stewart, chocolate martini from G Living, bridesmaid dress from Watters & Watters, table setting from Rosanna, Trophy cupcake via NYC Blondie & Brownie
 I love this time of year! Putting up the tree last weekend inspired me to put together a holiday-inspired palette that will be unveiled tomorrow. As a hint, our Bloom invitation (as shown above) would be a great companion to it...
 If you don't have a lot of experience planning your own travels, don't give up on the idea that you can put together a honeymoon on your own. After determining where it is you want to go, follow these basic steps to working out all of the details: - Buy your plane tickets.
Once you have tickets purchased, your dates and starting/ending points are set in stone. If you are planning a trip that involves moving around from point to point, think about buying an “open jaw” ticket. This will allow you to arrive in one city, but leave from another. These type of tickets don’t cost much more, but can save you time and other costs further down the line.
- Develop a potential itinerary.
Base your itinerary on the number of "nights" you want to spend in each place. Use a map to figure out a logical route for your journey. Be sure to include one night for any overnight flights. Most importantly, don’t forget to consider travel time between destinations. Rework your itinerary until it feels just right. If you don't plan on moving around during your honeymoon, skip ahead to the next step.
- Book hotels.
Now that you have your itinerary finalized, start researching and reserving hotels for each stop. Using email or a hotel’s website, you might contact a few hotels for each destination to see if there is availability during your stay. If you want to be sure that you're getting a hotel that will cater to your needs, check each hotel’s rating on TripAdvisor.com. If every hotel you contact is booked, revisit your itinerary. Look at a map and see if it’s logical to change your route. If that’s not possible, research smaller towns close to your desired destination to see if there are more options for lodging. Doing so can often lead to big savings.
- Decide how you’ll get from point to point.
Get a train pass and/or reserve a car. Again, if you don't plan on moving around during your honeymoon, skip ahead to the next step.
- Finally, plan all the fun bits!
Make any necessary sightseeing reservations. If you're a foodie, figure out where you might want to eat. Whatever you decide, make sure it's a nice mix of relaxation and fun.
 Planning a honeymoon abroad can be a daunting task—especially when you're already planning a wedding. With some online research, it's possible to find destinations that will make your trip special (and affordable). The following links are useful for general planning tips, as well as hotel and restaurant recommendations: Maps & Guidebooks (for offline planning):
Tomorrow, we'll post a how-to detailing the steps to take when planning your honeymoon.
   This past spring, I put together a diaper cake for a co-worker who became a new mother. She was on bed rest for a good portion of her pregnancy, so I wanted to send over a special treat that was not only cheerful, but also useful. If you are hosting a baby shower, this project could also double as a pretty (and unique) centerpiece.
Although it might look complicated, the "cake" was fairly easy to create. I followed these instructions, but think there should have been direction as to what size of a cardboard cake platform to use. I ended up with one that was a bit on the large side, so I'd recommend getting the 14" size.
Now, I just have to wait for more friends to procreate... ;)
|
|
|
|
|
|
|
|